Roofs rarely fail all at once. More often, a leak traces back to a few inches of metal tucked under shingles where planes meet walls, chimneys, skylights, or valleys. That thin metal, the flashing, does the quiet work of catching water and sending it away before it slides into your home. When it falters, even a sturdy shingle roof can turn into a sponge. I have seen thousand-dollar kitchen repairs caused by a two-dollar nail hole in step flashing. The lesson is simple: shingles shed water, flashing manages it. If you understand the difference, you can repair the right thing and stop the leak for good.
Where leaks really start
A shingle field in good shape is surprisingly forgiving. You can have minor granule loss and a few curled tabs without immediate leaks. Flashing, on the other hand, has no tolerance for gaps or wrong overlaps. Cracks in caulk around a pipe boot, missing step flashing along a sidewall, an open seam in counterflashing around a chimney, or exposed nails on a valley shield are the usual culprits. The leak often shows up 6 to 10 feet downslope and several rafters away from the source, because deckings and rafters carry water along their grain before it drips into the room below. That delay confuses homeowners into blaming the shingles in the wrong spot.
I keep a mental map of classic failure points. Sidewall transitions where step flashing should interlock with each shingle, headwalls where apron flashing meets siding, valleys with woven shingles that trap debris, chimney saddles and back pans, and any place a pipe penetrates. Skylights deserve their own category: factory kits work well as long as the roof pitch matches the kit and the underlayment laps in the right sequence. When a shingle roofing contractor gets called to “replace a few shingles,” the best ones start these checks before pulling a bundle from the truck.
Differentiating shingle problems from flashing problems
Before swinging a hammer, I look for signatures. A circular brown stain in the ceiling near a bathroom often means a cracked neoprene pipe boot. Stains that follow the slope and then stop above a window can indicate failed step flashing under a sidewall. Damp wood at the center of a wall, not aligned with rafters, can be ice dam back-up or a valley failure. Granules piled in gutters mean aging shingles, but not necessarily leaks. Rust streaks near a chimney usually mean the counterflashing or back pan is fatigued.
A common diagnostic trick works even if you are not a pro: during a light rain, go into the attic with a headlamp. Trace the wet area to its highest point. Touch the sheathing, then follow the wetness upslope until it stops. That stopping point aligns roughly with the leak source outside. While you are there, smell for mold and check for daylight at penetrations. On older homes, I sometimes find doubled-up composition shingles laid over original cedar. Those roofs hide nailed-through flashing and quickly become leak factories.
How step flashing should work on a shingle roof
The rule is one piece of step flashing for each shingle course along a sidewall. Each L-shaped piece laps the shingle below and tucks up behind the siding or a counterflashing leg. The next shingle covers the vertical leg of the previous piece, creating a cascading overlap that sends water away. Nails should never penetrate the vertical leg that goes against the wall, only the horizontal leg, and those nails should be covered by the next shingle.
Shortcuts are everywhere. Roofers sometimes run a long continuous “apron” and smear it with sealant, or they nail through the wall leg to stop slippage. Both fail. Water finds that nail and drips into the wall cavity. Another shortcut is relying on siding caulk to seal gaps where counterflashing is missing. Caulk ages, shrinks, and releases. Proper metal-to-metal overlaps outlast caulk by decades.
Pipe boots, skylights, and valleys
Pipe boots deserve respect given how often they cause trouble. Neoprene collars dry and fissure in 7 to 12 years under UV exposure. I have seen them crumble in your hand while the shingles still had five years left. The best repairs replace the boot, not just smear roofing cement. On premium jobs, I specify metal boots with neoprene seals or lead with a formed collar on the stack, especially on hot south-facing slopes.
Skylights fail around their corners when the step flashing sequence is broken during a roof shingle replacement. Factory flashing kits are matched to pitch ranges. If you install a low-slope kit on a steeper roof, you can still get wind-driven leaks at the side steps. Many leaks blamed on the glass are really underlayment or flashing sequencing errors. Be wary of installing skylights flush with the roof on low pitch. A curb and saddle flashing behind it add insurance.
Valleys move a lot of water. Open metal valleys, with shingles trimmed back from a visible center line, shed pine needles and ice better than woven valleys. In snowy climates, I prefer a 24 to 36 inch strip of ice and water membrane centered in the valley under the metal. On roofs with frequent leaf litter, an open valley with hemmed edges is less likely to clog. Exposed nails near the valley are a no-go. Nails must sit far enough away that flowing water never touches them.
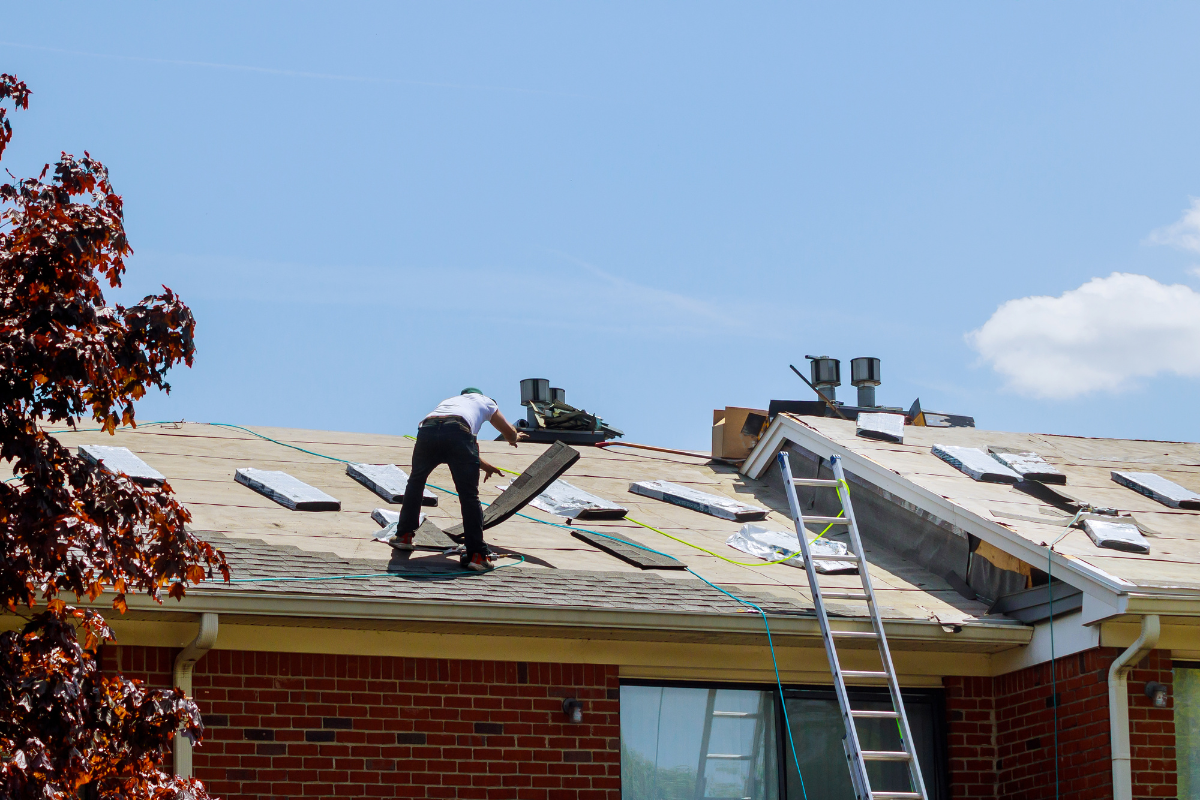
Tools, materials, and a safe setup
Working on a shingle roof without the right setup invites injury and poor work. Even seasoned roofers respect gravity. I use a roof harness, anchors rated for fall arrest, and a pair of roof jacks with planks on anything above a gentle pitch. Non-marring shoes with clean soles improve footing. A magnetic sweeper keeps lawns and driveways nail-free later.
For materials, I keep step flashing pieces sized 5 by 7 inches in galvanized or aluminum to match the site, a coil of step flashing for custom cuts, pre-bent counterflashing in common profiles, pipe boots in several diameters, roofing nails with ring shanks, quality roofing cement used sparingly, and a butyl-based flashing tape for underlayment transitions. Ice and water membrane belongs at eaves, valleys, and around critical penetrations. For fasteners against masonry, Tapcons or lead shields with stainless screws hold counterflashing in mortar joints. If the home is coastal, I push for stainless or high-grade aluminum to limit corrosion.
A practical path to stopping a leak
Every house presents its own puzzle, but the repair sequence follows a logic that reduces guesswork. Here is a concise field-tested flow you can follow or use to evaluate a shingle roofing contractor.
- Verify the source. Check the attic during rainfall, trace wetness upslope, and mark the deck below the suspected area with a pencil so you can find it from above. Expose the area. Carefully lift shingles with a flat bar, remove nails without tearing the mat, and open at least two courses upslope and two feet to each side of the suspected flashing. Rebuild the water path. Replace damaged underlayment, install ice and water membrane at valleys, saddles, and around penetrations. Reset step flashings one per course with correct overlaps. Address penetrations. Swap cracked pipe boots, ensure skylight kits match pitch, and add a back pan or saddle behind chimneys wider than 24 inches. Close and test. Re-shingle with proper offsets and nail placement, seal exposed cut lines lightly, then hose-test starting low and moving upslope, watching from the attic if possible.
That list covers most residential scenarios without overcomplicating the order. What matters is removing enough material to see the error and then reassembling in the right sequence so water always laps over, never under.
Repairing step flashing at a sidewall
Picture a two-story cape with a dormer, interior stain near the dormer’s downstream corner. On the roof, you see caulk squeezed along the siding line, but no visible step flashing legs. That tells you the flashing never lapped behind the siding, or the siding sits too low. I lift the lowest two shingle courses, then pry the siding gently. If it is clapboard, you can flex it enough to insert new step flashings. If it is fiber cement, you might need to remove a course for access.
Each new step piece slides under the siding and over the shingle below. I nail the horizontal leg high enough to be covered by the next shingle, never through the vertical leg. At the bottom where the sidewall meets the eave, I form a kickout flashing to throw water into the gutter, away from the wall. Kickouts matter. Without them, sidewalls show rot at the lowest few feet. Reinstall the siding with a small gap above the shingles so water and debris can shed. Sealant is not your water barrier here, it is only a garnish at the siding joint.
Chimneys: the back pan and counterflashing difference
Chimneys concentrate problems. A proper chimney flashing package includes four parts: step flashing up the sides, a wide back pan behind, apron flashing in front, and counterflashing that tucks into mortar joints and covers the step and back pan laps. The counterflashing is not https://louisstwc703.lowescouponn.com/roof-shingle-installation-over-existing-layers-pros-and-cons decorative trim; it is the raincoat over the raincoat.
For back pans, I prefer a single piece at least as wide as the chimney plus 8 to 12 inches on each side, with a head bend to direct water around the chimney into the field. If a saddle or cricket is warranted, build it to split the flow and flash it like a mini-roof with step flashing up both sides. Trying to stitch together narrow pieces behind a wide chimney invites leaks at seams. In freeze-thaw climates, soldered seams on copper back pans earn their keep.
Cutting reglets in mortar joints at least 1 inch deep allows counterflashing to lock in with a bend and sealant. Surface-applied “L” flashing glued to brick fails faster. When homeowners ask if we can skip the counterflashing “to save time,” I decline. I have replaced too many interior plaster walls to take that shortcut.
Skylight specifics that separate good from leaky
With skylights, the kit and the sequence must agree with the roof’s pitch and thickness. I lay a self-sealing membrane at least 6 inches out from the curb on all sides, with the lower piece installed first, then sides, then top, so each layer laps over the previous. Factory step flashing pieces should interleave with shingles, not sit on top of them. Cut shingles cleanly at the corners to avoid fishmouths. If the roof has high-profile architectural shingles, be careful that the thicker butts do not prop the step flashing up and create channels. Sometimes a small shim of shingle under the step flashing along the curb evens the plane and prevents wind-driven rain from finding a low gap.
If an older skylight weeps between the glass and frame, flashing will not solve it. That becomes a roof shingle replacement decision point, because pulling and swapping a skylight on a tired shingle roof in the middle of winter makes little sense. Plan it with the roof shingle installation so the underlayment continuity is perfect.
When a pipe boot is the villain
Most homeowners can spot the cracked collar if they know where to look. The repair feels straightforward, yet I still see mistakes. Do not cut away shingles beyond what you need, and do not drive nails through the top of the flashing collar where water can reach them. Slide the new boot under the upslope shingles and over the downslope course. Nails sit at the bottom corners where the next shingle covers them. On low-slope roofs, run a band of membrane under the boot skirt for extra insurance.
On copper vent stacks, use lead boots. Form the lead down into the pipe and fold it in slightly. Avoid mixing incompatible metals. Galvanic corrosion can eat a hole faster than sun can crack rubber.
Repair or replace: reading the roof’s remaining life
A good shingle roof speaks through its surface. Curled corners, widespread granule loss exposing black mat, cracked tabs, and brittle texture point to an aged system. If you tap a shingle and it fractures like a cracker, repairs become band-aids. In that case, go beyond shingle roof repair and consider a roof shingle replacement that addresses underlayment, ventilation, and all flashing in one pass. Solving a chimney leak with pristine flashing does little if the surrounding shingles wash out in the next storm.
If the roof is mid-life, meaning 8 to 12 years into a 25 to 30 year architectural shingle, targeted repairs make sense. You can rebuild a valley, swap pipe boots, and reset step flashing without touching the entire slope. The key is tying the new work into the old so laps face the right direction and nail lines land in the sweet spot. I tell clients that a focused repair should give them at least half the remaining life of the roof if the surrounding field is sound.
Ice dams, underlayment, and attic conditions
Flashings get blamed for winter leaks that originate from heat loss. Ice dams form at the eaves where meltwater refreezes and backs up under shingles. Even perfect flashing cannot save you if water travels uphill under the roof covering. Ice and water membrane at eaves helps, but the durable fix is air-sealing and insulating the attic, plus adequate ventilation. I have seen 20-degree temperature differences between bays above bathrooms with leaky exhaust fans and the rest of the attic. That patch of warmth melts snow in stripes, and the melt path follows valleys and sidewalls, overloading their flashings.
Before calling a shingle roofing contractor for emergency midwinter work, check that bath fans vent outside, not into the attic, and that baffles at soffits are open. Sometimes a modest air-sealing effort reduces the ice load enough that your existing flashing survives the season, buying time for a more controlled roof shingle installation or repair in spring.
Working with a contractor without paying twice
Roofing work looks simple from the driveway, yet the details govern outcomes. When you hire, ask how they will approach the specific flashing at fault. If they propose caulk as the main fix, keep looking. If they cannot describe the step flashing sequence or how they will install a kickout, keep looking. A competent shingle roofing contractor will talk in terms of overlaps, coverage, and water paths, not just “sealing it up.”
Expect the estimate to itemize removal and replacement of step flashing, counterflashing as needed, underlayment repair, and shingle tie-ins. If masonry work is involved, ask who cuts the reglets and matches mortar color. For skylights, ask for the manufacturer kit SKU suited to your roof pitch. Short answers are red flags.
Cost, time, and realistic expectations
People ask what a leak repair should cost. Prices swing with access, height, and regional labor, but you can use ranges. Replacing a single pipe boot usually takes under two hours and runs in the low hundreds. Rebuilding step flashing along an eight-foot sidewall often takes half a day for two workers and lands in the mid hundreds to low thousands, especially if siding needs careful removal and reinstallation. Chimney packages that require counterflashing, a new back pan, and mortar work can reach into several thousand, particularly on steep roofs. If the repair involves a valley rebuild with new metal and underlayment, plan for a day.
Any quote that seems suspiciously low probably assumes surface fixes and sealant. Those rarely last. Water will test your work every time it rains, and it is a patient critic.
Techniques that extend the life of your work
There are small practices that add years. Hemming the edges of valley metal prevents water from creeping sideways and stiffens the metal against foot traffic. Rounding inside corners of cut shingles reduces stress points that can crack later. Using ring-shank nails holds better in older decking. Folding a tiny kick at the bottom of step flashing pieces directs drip away from the wall plane. Lapping ice and water membrane with clean, rolled pressure increases adhesion, and warming it slightly on cool days makes a better bond.
One more: clean as you go. Bits of old nails, granules, and asphalt litter can keep flashing from sitting flat. I take a moment to brush surfaces before setting new metal. A flat installation leaks less.
What homeowners can do from the ground
You do not need to climb on the roof to protect it. Keep gutters clean so water exits rather than rising against the eave edge. Trim branches that scrape shingles and dump debris into valleys. From the ground with binoculars, look at pipe boots for cracks and at sidewalls where roof meets wall for staining. After a windstorm, scan for missing tabs or lifted ridge caps. If a chimney looks like a patchwork of caulk instead of crisp counterflashing lines, put it on the repair list before it escalates.
If you plan a repaint or siding project, coordinate with roof shingle repair work. Painters often caulk over step flashing or install siding too tight to the shingles. A small gap, roughly a finger’s width, is your friend. It sheds water and lets the flashing do its job.
Why sequencing beats sealant, every time
Water is predictable if you give it a path. Gravity and surface tension want to bring it down and along. Good roof work respects that and builds shingle courses and flashing laps so water never sees an uphill seam. Sealant plays a role as a supplemental measure at terminations and cuts, but it is not the main defense. Sun, movement, and dust degrade it. I have revisited repairs after ten years where the metal remained clean and tight, and the small bead of sealant had worn away. The roof still performed because the laps were right.
A shingle roof survives storms because every component understands where water goes. Shingles shed. Flashing redirects. Underlayment backs up both. Nails only go where they do not invite leaks. If your repairs honor that system, you stop chasing stains and start enjoying quiet ceilings.
When full roof shingle replacement is the right call
There is a point where spot fixes prolong pain. If your attic smells musty after every rain, if multiple valleys show rot, if the deck flexes underfoot, and if the shingles crumble while lifting them, plan a comprehensive roof shingle replacement. Use that opportunity to fix the structure beneath. Replace rotten sheathing, add proper ice and water membrane at eaves, valleys, and penetrations, and update ventilation. Specify metals that match your environment. In coastal air, aluminum and stainless resist salt better than basic galvanized steel. Around copper gutters or finials, avoid aluminum flashing to prevent galvanic reactions.
During the roof shingle installation, insist on step flashing one per course at all sidewalls, new kickouts where roofs drain into walls, properly sized back pans and saddles at chimneys, and skylight kits matched to pitch. The crew should stage materials so they are not stepping on bare underlayment in the rain and should finish slopes the same day to avoid overnight exposure. When a shingle roofing contractor treats flashing as central, not an afterthought, your new roof earns its warranty.
A final word from the ladder
I have chased leaks in hundred-year-old farmhouses and in brand-new suburban builds. The age of the home is less important than the care given to water’s path. On one call, a family had repainted a sidewall three times and replaced siding twice. The leak persisted. The fix was a kickout flashing at the bottom of the dormer, a piece of bent metal smaller than a paperback. Water had been running behind the siding for years. One hour later, the wall dried. That is the power of proper flashing.
If you suspect a leak, act before the next heavy rain. Verify the source if you can. Hire for sequence and detail, not speed. Whether you choose a targeted shingle roof repair or a full system overhaul, prioritize the metal at the joints. Flashing is not a line item to trim, it is the part that keeps your house dry.
Express Roofing Supply
Address: 1790 SW 30th Ave, Hallandale Beach, FL 33009
Phone: (954) 477-7703
Website: https://www.expressroofsupply.com/
FAQ About Roof Repair
How much should it cost to repair a roof? Minor repairs (sealant, a few shingles, small flashing fixes) typically run $150–$600, moderate repairs (leaks, larger flashing/vent issues) are often $400–$1,500, and extensive repairs (structural or widespread damage) can be $1,500–$5,000+; actual pricing varies by material, roof pitch, access, and local labor rates.
How much does it roughly cost to fix a roof? As a rough rule of thumb, plan around $3–$12 per square foot for common repairs, with asphalt generally at the lower end and tile/metal at the higher end; expect trip minimums and emergency fees to increase the total.
What is the most common roof repair? Replacing damaged or missing shingles/tiles and fixing flashing around chimneys, skylights, and vents are the most common repairs, since these areas are frequent sources of leaks.
Can you repair a roof without replacing it? Yes—if the damage is localized and the underlying decking and structure are sound, targeted repairs (patching, flashing replacement, shingle swaps) can restore performance without a full replacement.
Can you repair just a section of a roof? Yes—partial repairs or “sectional” reroofs are common for isolated damage; ensure materials match (age, color, profile) and that transitions are properly flashed to avoid future leaks.
Can a handyman do roof repairs? A handyman can handle small, simple fixes, but for leak diagnosis, flashing work, structural issues, or warranty-covered roofs, it’s safer to hire a licensed roofing contractor for proper materials, safety, and documentation.
Does homeowners insurance cover roof repair? Usually only for sudden, accidental damage (e.g., wind, hail, falling tree limbs) and not for wear-and-tear or neglect; coverage specifics, deductibles, and documentation requirements vary by policy—check your insurer before starting work.
What is the best time of year for roof repair? Dry, mild weather is ideal—often late spring through early fall; in warmer climates, schedule repairs for the dry season and avoid periods with heavy rain, high winds, or freezing temperatures for best adhesion and safety.